after some trial and error here my log how to setup Linux as dualboot on my brand new msi gs70 with Win8 and Raid-setup. basically i did this:
- repartition to get free space
- change bios uefi settings
- setup ubuntu 12.04.3 64bit
- fix grub
- change bios uefi settings
- setup ubuntu
Status:
working: dual boot with grub. booting ubuntu 12.04.3 64bit, wifi, X with intel, Suspend, Sound, Touchpad, Ethernet, Optimus with Bumblebee...not working yet: SDcards, Camera, External Displays (possibly with manual xorg-setup
please comment if you have some hints or solutions
0. preparations
i did the Bios upgrade first. boot Win8 and get the right Bios (if you have a win8-raid setup choose "version 707") http://www.msi.com/product/nb/GS70-STEALTH.html#download. extract and startup the FLASHWIN64.bat1. repartition to get free space
i installed EaseUS Partition Master (free version here: http://www.partition-tool.com/landing/home-download.htm). and changed the C: partitions Size. besides i removed the partitioning of the Second Drive. Partition C: resized to 100GB (101946.3MB)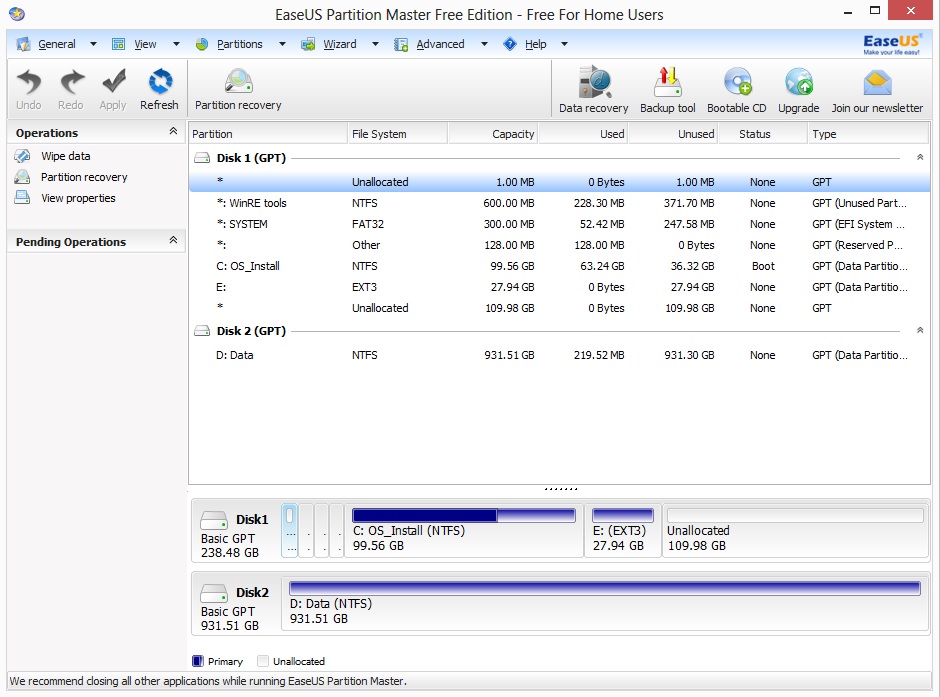 |
| here after the linux setup. so the E: you dont have, but much more unallocated space. |
get the 10.4.3 64bit iso (http://www.ubuntu.com/download/desktop/questions?distro=desktop&bits=64&release=lts) and copy it with "pendrive usb installer" to a usb stick (at least 1GB size) like described here: http://www.ubuntu.com/download/desktop/create-a-usb-stick-on-windows
i just took "try unlisted linux iso" and selected the downloaded iso and the right usb-drive.
NOTE: maybe there is a way to delete some stuff inside win8 to get its partition even smaller... i'll check this later on somewhen.
2. change bios uefi settings
restart Machine. when seeing the msi logo press DEL several times. inside Bios change the settings:- Boot mode select: legacy
- Fast boot: disabled
- maybe you need to change the boot order below also, but i'm not sure if its really needed
 |
| should look like this for "Fast Boot" and "Boot mode select" |
3. setup ubuntu
press F11 while msi logo shows up and then select your usb device.you should then see a grey-screen with some icons at the bottom, just press enter and start with the setup directly...
if it asks your "installation type" choose "something else" so you can choose which partition. i selected the free space after "/dev/mapper/..._Volume1p4" then "add" and added an ext4 partition with "/" as mountpoint. i did not add any swap, but if you want do so.
the trickiest part was what device to use to install the bootloader. after some trials it seems like it might be best to use just Volume1p1 as one needs to fix grub anyway. actually i dont know which one i've taken in the end, as it just came up again telling me to chose the right one. which i had to do several times...
seems like ethernet is not working, so i had to use wifi. at top right there appears the wifi-radar sign and it should be possible to use your wifi with it. at least here it worked.
4. fix grub
press F11 while msi logo shows up and then select your usb device. boot into live preview modus of your usb-stick to repair grub.i connected via wifi as ethernet was not working. then open a terminal (mouse left-top corner -> terminal) and enter:
sudo add-apt-repository ppa:yannubuntu/boot-repair && sudo apt-get update
sudo apt-get install -y boot-repair && (boot-repair &)
then just hit "recommended repair". if it asks you to paste something in the console do so (mark -> ctrl+c, terminal -> ctrl+shift+v)
5. change bios uefi settings
just revert the setting changes from 2.- Boot mode select: UEFI
- Fast boot: enabled
6. setup ubuntu
HINT: something went wrong and i dont get the login-screen, but ubuntu itself is running. get into a shel with CTRL+ALT+F1, and login. at least here i still was connected with the wifi i configured during installer.for the intel grafic i then did this (i hope i did not forget anything, as i had a long way to go):
sudo add-apt-repository ppa:ubuntu-x-swat/x-updates
sudo apt-get purge nvidia-* bumblebee
sudo apt-get --purge autoremove
sudo apt-get install virtualgl linux-headers-generic vim xinit
startx
i use "gnome" desktop (switch at the login screen with icon next to your name), as unity2D tend to eat more than half the cpu here. maybe i need to recheck the grafic-card and stuff. but this way i can at least really work...
i use synaptiks to configure the touchpad:
apt-get install kde-config-touchpad
then startup "synaptiks" and configure it like this:


here some of my other tweaks (remove ubuntu-one, empathy, get the normal scrollbars back)
apt-get remove ubuntuone* empathy overlay-scrollbar
echo "export LIBOVERLAY_SCROLLBAR=0" > /etc/X11/Xsession.d/80overlayscrollbars
set up the ethernet like described here http://askubuntu.com/a/333973 :
apt-get install fakeroot build-essential linux-headers-$(uname -r)
cd /usr/src/
mkdir compat_src
cd !$
wget http://www.kernel.org/pub/linux/kernel/projects/backports/stable/v3.9-rc2/compat-drivers-3.9-rc2-2-su.tar.bz2
tar xvjf !$:t
cd compat-drivers-3.9-rc2-2-su
wget https://gist.github.com/Germar/ea11bc1e998fee965f03/raw/5b1d28d42f0d4f2c4bf063002fde126becc61928/alx-patch.txt
patch --dry-run -p1 < alx-patch.txt
patch -p1 < alx-patch.txt
./scripts/driver-select alx
fakeroot make
make install
modprobe alx
to not loose ethernet after recovering from hibernate:
vi /etc/pm/config.d/modules
SUSPEND_MODULES="alx"
:wq!
after kernel upgrades you need to do this to get ethernet working again:
cd /usr/src/compat_src/compat-drivers-3.9-rc2-2-su/
fakeroot make
make install
modprobe alx
how to get the "Public" folder working:
right click on the "Public" folder -> sharing options -> select everything. as far as i remember it then asks to install samba. otherwise apt-get install samba smbfs. i also added user rights, so oneself can move the files from that public folder to somewhere else:
vi /etc/samba/smb.conf
add to the global section:
create mask = 0777
directory mask = 0777
:wq
service smbd restart
install some other useful tools
apt-get install ...
update 02.oct.
bumblebee setuplike here https://wiki.ubuntu.com/Bumblebee#Installation
Enable the Universe and Multiverse repositories in /etc/apt/sources.list
sudo add-apt-repository ppa:bumblebee/stable
sudo apt-get update
sudo apt-get install bumblebee virtualgl linux-headers-generic bbswitch-dkms
reboot
optirun glxgears
optirun works, also after suspend if you install bbswitch-dkms.
notes for virtualbox:
dpkg-reconfigure virtualbox-dkms
dpkg-reconfigure virtualbox
modprobe vboxdrv
modprobe vboxnetflt
please comment if you have some hints or solutions